30th May
Tools used - Hammer, dog tail, straight edge, level, nail gun [gas and air] radial saw, 8m tape, sharp pencil,
safety gear used - safety muffs, boots and glasses
Today was spent on finishing straighting and plumbing the walls.
Then nailing them off 2x100mm galv nails 2 in the top and 2 in the bottom of the blocks [all the blocks up the length of the stud]
Then we started putting in the last of the dwangs. measure each one then cut with the radial saw. Nailed them in from beneath. Most angled up from the outside of the stud [when possible] other wise they were nailed up into the dwang itself back into the stud [again 2 x 100mm galv nails]
Tuesday, 29 May 2012
Monday, 28 May 2012
29th May
First hour was spent on the different types of roofs
and trusses
Hip roofs - pitched on all sides / apes, ridge runs along the top / hips are where 2 roof plans meet [exterior] / valley, where 2 internal roof plans meet
Gable roofs - where the ends are a triangle section of the wall
Dutch gable roof - this has both parts of a hip and gable roof
Mansard roof - has 2 angled parts to the roof with the side are also on an angle
Skillon roof - often has only a single pitch with both the roof and ceiling aalong the same pitch
Mono pitch roof - where the roof runs on a single pitch and the ceiling runs on the horizontal plan
Then the different types of roof trusses
Common truss - bottom and top cords / the pitch is the angle of the roof / webs are the internal pieces of timber / put together with nail plates
Girder truss - longer than a common truss with extra webs / vertical and angled
Troncated girder truss - has no top, used Hip roofs
Troncated jack truss - small trusses used on a hip roof
then we continued the plumbing and nailing off the internal walls [2 x 4inch nails at the top and bottom of each block] and nailed the bottom plate to floor [3 x 4inch nails at 600 centres]
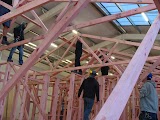
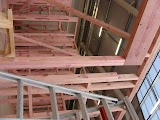
last session was spent on putting up the trusses.
first we put up the troncated girder truss then conected the troncated jack truss, then the first of the grider truss. These trusses were tack in. The process was repeated on the other end.of the house.
then a string line was run between the 2 grider trusses to make it quicker to line up the rest of the grider trusses. As these trusses went up temp braces was nailed along the outside to keep the trusses standing up right. Once they were all up 4by2 was then nailed along the bottom of the trusses to stop any horizontal movement [plus we were told this increased the strength of the trusses by 80 percent].


First hour was spent on the different types of roofs
and trusses
Hip roofs - pitched on all sides / apes, ridge runs along the top / hips are where 2 roof plans meet [exterior] / valley, where 2 internal roof plans meet
Gable roofs - where the ends are a triangle section of the wall
Dutch gable roof - this has both parts of a hip and gable roof
Mansard roof - has 2 angled parts to the roof with the side are also on an angle
Skillon roof - often has only a single pitch with both the roof and ceiling aalong the same pitch
Mono pitch roof - where the roof runs on a single pitch and the ceiling runs on the horizontal plan
Then the different types of roof trusses
Common truss - bottom and top cords / the pitch is the angle of the roof / webs are the internal pieces of timber / put together with nail plates
Girder truss - longer than a common truss with extra webs / vertical and angled
Troncated girder truss - has no top, used Hip roofs
Troncated jack truss - small trusses used on a hip roof
then we continued the plumbing and nailing off the internal walls [2 x 4inch nails at the top and bottom of each block] and nailed the bottom plate to floor [3 x 4inch nails at 600 centres]
last session was spent on putting up the trusses.
first we put up the troncated girder truss then conected the troncated jack truss, then the first of the grider truss. These trusses were tack in. The process was repeated on the other end.of the house.
then a string line was run between the 2 grider trusses to make it quicker to line up the rest of the grider trusses. As these trusses went up temp braces was nailed along the outside to keep the trusses standing up right. Once they were all up 4by2 was then nailed along the bottom of the trusses to stop any horizontal movement [plus we were told this increased the strength of the trusses by 80 percent].
Sunday, 27 May 2012
28th May
Tools used:- ear, foot protection, hammer and nails, 30m and 8m tape measures, string line, straight edge, level
Today we continued to check the top plates were straight by setting up a string line across the top plate then using blocks at each end and a dodger to check along the entire length,
Where the top plate was out, we adjusted the braces to either move the plate out or inwards a few mm
After 1pm we started on making sure each wall was parallel. We took measurements starting from the outside walls taking measurements from each corner, checking they were the same [when they were out we moved the frame [only by mm] so the were the same, then had to check they were plumb as well]
Sunday, 20 May 2012
21st May
First hour was spent on theory on checking the walls are plumb using a blump bob and staright edge with the level
then had to add abit more to the blogs to finish off task for site set out
after launch carried on with the erecting of the exterior frames. Once that was done we started to level and plumb the corners then straight the bottom plates
Sunday, 13 May 2012
Tuesday, 8 May 2012
9th May
Today we went up to the other build and started to put up the ceiling gib
Had a run down on how to apply the adhesive 200, 400 800, 1m, making sure not to screw through the adhesive.
Where and how far apart the screws go in
Measuring and cutting each sheet of gib , cutting out holes for the lights
How to lift the sheets into place and screwing them in
Monday, 7 May 2012
8th May
Tools:- 8m tape, 1m fold rule, sharp pencil, square, radial arm saw, compressed air nail gun
Hazards:- radial saw, nail guns [noise, miss use of these tools]
Protective Gear:- ear muffs and safety boots, safety glasses
morning session was spent on group presentation on piles [1 hour]
the rest of the day was spent measuring the last of the bottom and top plates, then we started tp nail them together - studs, timmers, blocks and gwangs, then the lintel, finished off with the jack studs
morning session was spent on group presentation on piles [1 hour]
the rest of the day was spent measuring the last of the bottom and top plates, then we started tp nail them together - studs, timmers, blocks and gwangs, then the lintel, finished off with the jack studs
Sunday, 6 May 2012
7th May
The rest of the day was sent out finishing of marking all the top and bottom plates. Then we started to put the frames together
- Tools:- 8m tape, 1m fold rule, sharp pencil, square,
- Hazards:- frames laid out so had to be careful not to trip over them / noise from the saws and nail guns
- Protective Gear:- ear muffs and safety boots
The rest of the day was sent out finishing of marking all the top and bottom plates. Then we started to put the frames together
Tuesday, 1 May 2012
2nd may
Then we did an exercise describing each part, giving it to another student to work out what we had just described

The rest of the day was sent making in all these parts on the bottom and top plates
- tools: 30m tape, 8m tape, fold rule, pencil [sharp], sliding square
Then we did an exercise describing each part, giving it to another student to work out what we had just described
The rest of the day was sent making in all these parts on the bottom and top plates
Subscribe to:
Comments (Atom)