Monday, 30 April 2012

1st May
  • Tools: radial arm saw, hammer, chisel, sliding square, pencil [sharp], 8m tape, folding rule, sliding F clamp, hand saw
  • safety equipment: ear muffs, safety glasses, safety boots
  • Hazards: radial arm saw [clean work area / people safe distance / no loose clothing], chisel [keeping it sharp, chiseling away from you, keeping hands behind what you are chiseling]
The morning started with the tutors going over what we will be doing on the wall framing part of our course

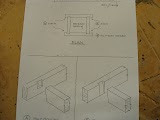
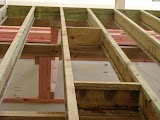
Then some of us went on to do 'Dove tail wall plate joints' [5.5 hours]

 
First we had to change some of the measurements - 200 to 300 / 47 to 45

   
Then from the measurements worked out how long each piece of wood was - peice that had A & B joins was 45+90+300+90+45 =570mm / piece B&C was 90+300+90+45=525mm / piece C & D was 90+300+90=480mm / and piece A & D was 45+300+90+45=480mm

cutting the wood to these lengths we then measured out each piece to where each dove tail and sockets are going
   
Then using a hand saw [where we could] cut out the dove tails and sockets in strips then chiseled them out

Sunday, 29 April 2012

30th April
  • Tools:  8m tape, fold ruke, pencil [sharp], chalk line, radial saw
  • Safety equipment: safety boots, ear muffs, safety glasses
  • Hazards: radial saw
Today we started on measuring out where the walls will go on the floor according to the plans
 We started measuring 90mm in from each corner with our 8m tape [using our fold rules to make sure we are measuring off the boundry joist and not the flooe edge, as might be off by a couple of mm's


.
Then we worked on our apprentice dairies  to make sure we are up to date and have put the right things in decribing what we have done over the last few weeks

A few of us also helped unload a truck of material

Just before afternoon break a couple of us started on the setting out the bottom and top plates

Monday, 23 April 2012

24th April

  • Tools: chisel, hammer, hold out rule, hand plain, hand router, nail guns
  • Safety equipment: ear muffs, safety boots
  • Hazards: chisel - incorrect way of using - chiseling towards themselves / hand in front of chisel / chisel not sharp enough

First part of the morning was used to work on our blogs with Steve

 
 using the hand router

Then we went out and finished our oil stone cases
Chiseling out the bottom on an angle starting 35mm in from the ends to a depth of 5mm in the middle
Kept the chisel sharp by sharpening it on the oil stone on a 30 degree angle in a long fig.8 motion
Using the hand plain to finish the top of the case - first I plained the sides, then the ends to required  10mm with the point starting at 35mm

Once finished went on the help Takey and Regan [came to help just at the end, so only put up 1 shelf] that was already cut, so we only had to put it together using the gun and compressed air nail gun. They then had the measurements from the other shelf's so cut the last sheet for the top out, then nailed it to the frame and put it in the shelf

Sunday, 22 April 2012

23rd April

Today we started a hands tool project 'making an oil stone case'

  • Tools used: folding 1m rule, 8m tape measure, chisel, oil stone, hammer, Sharp pencil, square,
  • Hazards: Chisel - must be keep sharp so it doesn't  slip / unclean work area - keep wood shavings off work bench and regulary sweep floor around work bench
  • Safety equipment: ear muffs, safety boots

We were given a brief description of what was required, then we were given 2 pieces of D4S [dressed 4 sides] wood at 300mm by 75mm by 30mm


First we had to mark out where the oil stone was going to sit in the wood according to the plans.
Once this was done we chiseled out the area [approx. 13 - 15mm deep [keep the chesil sharp - sharpen in a fig.8 motion at approx 30 degrees]]


Fitted the oil stone so the bottom was tight and the top part of the case was lose


Then I started on the base, measuring in 35mm each end and finding the middle, drawing the line [on the side to a depth of 5mm] then chisel out a tin plate to follow chiseling out the rest [not finished]

Then we done a big clean up.


Tuesday, 17 April 2012

18th April

  • Tools used: 8m tape measure, folding rule,  hammer & nails [4" galv], broad knife

  • Power tools used: table saw, nail gun, radial saw
  • Hazards: radial saw / Table saw - Matt and Mark run through the safe use of this saw / the cut off switches on the machine and wall, how to adjust the blade and how to use the push stick, what safety equipment that should be worn - classes and ear muffs plus safety boots

  • Safety equipment: ear muffs, safety glasses, foot wear

Today we started with a brief talk about MSDS -Manafuctures Safety Date Sheets and Manafuctures instructions [today on the flooring sheets we are using .

Continued on from yesterday putting in joist blocks. We put extra blocks in where the inner walls [below where internal walls are not supported by the joist] according to the plans [2.5 hrs]

     
In the afternoon we [group 1] went with Cam to the other build to help put the ceiling bats in. We started with full bats then had to cut the rest to fit between the spaces.

Monday, 16 April 2012

17th April

Tools used: chisel, square, rule , hammer, pencil, 8m tape, hand saw

Power tools: radial saw, nail gun

Safety equipment: ear muffs, safety glasses, steel cap boots

We carried on with our chiseling exercise until Mark was happy that the joins were tight and had a 300mm square [worked on that up until lunch - 3 hrs]

         
The afternoon worked on the joist - putting small bracing blocks along the middle 2 bearers [no more than 1800mm apart - whiched worked out every 4 joist. [2 hrs]


Sunday, 15 April 2012

16th April

Tools used: Radial saw, 8m tape measure, builders pencil, chisel, hammer, hand saw, clamp

Safety gear: ear muffs, steel caps

Today we started with Mark taking our group through the radial saw. First we went through the safety - using ear muffs and safety glass, plus lose clothing, keeping a clean work area etc..
Then we all went through the process of measuring and cutting lengths of wood [480mm and 330mm lengths of  100mm by 50mm that we would later use to practice chiseling.


The exercise was to join the 4 pieces of wood together with a hole of 300mm by 300mm using a half housing join and the other side tapered housing join, using the chisel, hammer and hand saw.

We were also show how to sharpen the chisels using a shapening stone.

Tuesday, 3 April 2012

4th April

The morning session started with a review of the calculation for area [length x wide] and then the area cubed [length x width x depth] these calculations were used to work out how many piles [ordinary piles and anchor piles - on the plans T1 -ordinary piles 24 / T2 - anchor piles 8] approx. 1 hour

Then we went out to work on the house
Boundary joist first [15.5 Lm up each side / then 7.1 across the ends] we fixed the boundary joist to the bearer with clumps [temporary] took diagonal measurements to check if it was all square [done]
           
Then we started cutting and fixing the joist [7.1m] and temp nailed them in [3 hours]


Afternoon session was cutting and putting in a man hole. We had to cut out one joist and double it up. Same for the middle supports


Tools: hammer / 30m tape measure / 8 meter tape measure / hand saw / claps

Monday, 2 April 2012

3rd April

Today we started with calulations, square meter  area and the cube meters [approx 1.5 hours] then we went out to work on getting the piles set up right / plum and correct height. Some of the temp piles were taken out and replaced.
The corner piles were then leveled and braced with 100mm by 50mm  2.5 meter long
Tools used : builders level / hammer / 8meter tape measure / spirit level
Power tools : nail gun